How to edit a Post or Page in WordPress
Note: a page refers to your website pages that contain static content e.g. an about us, contact us, our services. A post refers to a news item, an article or blog post.
If you are familiar with Microsoft Word or Open Office then editing a page in the WordPress editor will be easy enough to pick up. In this lesson we’ll be covering the basic editing tools:
- Getting started
- Adding Text
- Formatting using the Editor Toolbar
- Using Headings
- Links
- Lists
Please remember – we really value your feedback and comments. If you have questions about editing a post / page – do make a comment below!
Getting Started
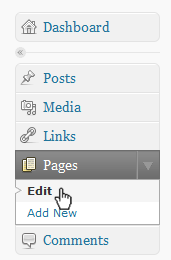
 After logging into your website administration area you’ll be presented with the dashboard. On the left hand side you’ll see the menu. Hover over the ‘Page’ navigation item and an arrow should appear, click on this to get a sub navigation drop down. Choose ‘edit’. (If you want to edit a post then you can do the same with the Post navigation item). You can see you can also ‘add new’ to add a new page.
After clicking the edit link you will be presented with a new page that lists all the pages on your website. Hover over each page title for your options. Click on ‘edit’ to gain access to the page content.
You may only need to update a sentence here and there – if so go for it! When you are finished don’t forget to click the ‘update‘ button on the right hand side to save your changes and publish them to the website. You can also ‘preview changes’ before you publish – that ‘preview button’ is located above the update button.
Adding Text
There are two ways to add text into the edit box:
- You can type directly into the the text box
So this is easy – just start typing directly into the text box! - You can paste in your content from a Word Document (or Open Office Doc).
If you have already written your content in a Word Doc then you’ll want to just paste it in instead of rewriting it.
Please don’t paste directly into the text box! Instead click the icon in the editor toolbar and paste the content into the pop up window. This will remove some of the nasty formatting that Word Docs are peppered with and save your website from picking up funny fonts and layouts.
Formatting using the Editor Toolbar
Once your added your text you’ll probably want to add some formatting – bold, italics etc. Directly above the text editor box you’ll notice the editor toolbar. If you only see one line of icons then click the ![]() button to see the full list. Hopefully some of these buttons are familiar to you. Below is just a short list of the most popular formatting tools (here’s the complete list of WordPress text editor formatting buttons and their functionality). And if you are confident by all means just go ahead and have a play with the buttons yourself. 🙂
button to see the full list. Hopefully some of these buttons are familiar to you. Below is just a short list of the most popular formatting tools (here’s the complete list of WordPress text editor formatting buttons and their functionality). And if you are confident by all means just go ahead and have a play with the buttons yourself. 🙂

Formatting Buttons
![]() Bold – to strongly emphasise a word or phrase – to use: highlight word & click icon or Press control key & B key
Bold – to strongly emphasise a word or phrase – to use: highlight word & click icon or Press control key & B key
![]() Italics – to emphasise a word or phrase – to use: highlight word & click icon or Press control key & I key
Italics – to emphasise a word or phrase – to use: highlight word & click icon or Press control key & I key
![]() Unordered list – creates a bulleted list – to use: start new line, click icon; for next item hit return key; to exit from list hit return key twice.
Unordered list – creates a bulleted list – to use: start new line, click icon; for next item hit return key; to exit from list hit return key twice.
![]() Ordered list – creates a numbered list – to use: start new line, click icon; for next item hit return key; to exit from list hit return key twice.
Ordered list – creates a numbered list – to use: start new line, click icon; for next item hit return key; to exit from list hit return key twice.
![]() Block Quote – for use with long quote from reference text or person – to use: highlight text and click icon.
Block Quote – for use with long quote from reference text or person – to use: highlight text and click icon.
![]() Link – create a hyperlink to a website or web page – to use: highlight text and click icon.
Link – create a hyperlink to a website or web page – to use: highlight text and click icon.
![]() Break Link – remove hyperlink – to use: highlight text and click icon.
Break Link – remove hyperlink – to use: highlight text and click icon.
![]() Spell Checker – checks spelling of article – click icon, suspected misspellings are underlined in red, right click underlined word for spelling suggestions.
Spell Checker – checks spelling of article – click icon, suspected misspellings are underlined in red, right click underlined word for spelling suggestions.
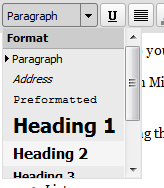
![]() Format Bar – format text using paragraphs and headings – to use: highlight text and click icon.
Format Bar – format text using paragraphs and headings – to use: highlight text and click icon.
![]() Paste in Text from Word Doc – paste text from a Microsoft Word Document – to use: click icon and paste copied text into the pop up window.
Paste in Text from Word Doc – paste text from a Microsoft Word Document – to use: click icon and paste copied text into the pop up window.
![]() Upload/Insert Image – add image to page/post – to use: position cursor where you want to insert media and click icon
Upload/Insert Image – add image to page/post – to use: position cursor where you want to insert media and click icon
Editing Directly in HTML
![]()
![]()
If you are familiar with HTML feel free to edit the HTML directly. To view the HTML source click on the HTML tab on the right handside of the editor. If you are putting in more complex HTML then be careful switching from HTML view to Visual view as you may loose your HTML code in the process.
Headings; h1, h2, h3
Your page will already contain a ‘Heading 1’ (or h1 for short) and this reflects your navigation name as well so change with caution! Pages should only contain one h1.
You can however have as many h2 or h3’s as needed. H2 are like sub headings and h3 are like sub-sub headings. We would advise that you use headings throughout your content to improve readability and SEO. In general headings should be short, descriptive and keyword rich.
To add headings to your content: Highlight phrase and choose ‘heading 2’ from the drop down formatting bar in editor toolbar.

Adding Links (Hyperlinks)
Good linking adds another dimension to your content; introducing readers to other parts of your website or referring them to other websites. When you add a link it is best to use descriptive phrases – i.e. instead of writing: Click here to visit my product page it would be better for readability and SEO to write: Find out more about my organic, homemade cookies.
To add a link:
- In a new window of tab of your browser go to the page or website that you want to link to.
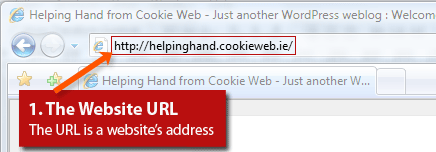
- go to the address bar of the browser and copy the full url (website address) including the http://

- return to the editing box and highlight the phrase you want to link
- click on the link button
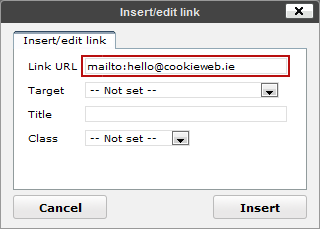
 in the toolbar and paste the copied URL into the ‘link URL’ field
 - if you want the link to open in a new window (useful if you are linking to a website that is not your own) then select ‘new’ window in the target field
- you may want to add a title to the link describing the destination of the link (i.e. this link opens in a new window)
- click the ‘insert’ button
- you should see the phrase or word is now blue and underlined… Success!
To add an Email link:
In order to add an email link you follow much the same steps as adding a hyperlink.
- Select and highlight the text that you wish to add the email link to
- Click on the link button
 in the toolbar
 - In the ‘Link URL’ box, remove the ‘http://’ and type ‘mailto’ before entering the email address.
- Please Note: Instead of linking a phrase such as ’email me’ or ‘contact us’ you should include the actual email address in the link phrase – eg: Email me at [email protected] . This allows people who use web based email clients like gmail and hotmail to copy and paste in your email address.
Remove a link:
To remove linkage just highlight the link and click on the unlink button ![]()
Lists
Lists are an excellent way to break up a long patch of paragraphs. You keep lists short though, no more than 6 or 7 items in each otherwise your lovely readers will loose interest after the first few items. If you do have a lot of listing to do then break up the lists under headings.
To create a list (in list format!)
- Hit the return key to start a new line.
- Click on the list (
 ordered or
  unordered ) icon and this will immediately indent and add a bullet or number.
 - Start typing your first item! When you’re ready for the next item hit the return key for another bullet
- When your finished the list hit the return key twice. Easy 🙂


Comments are closed.